- Products
- Services
- About
- Resources

I recently ran into some problems where the Adobe Reader process (Acrord32.exe) was using the maximum available CPU resources constantly. Even after Adobe reader program is closed, the process remains running in the background continuing to use all of the available CPU resources. Through research I found that the issue has been reported on Windows XP, Windows 7, Windows 2003 (TS and Citrix), Windows 2008 R2 (TS and Citrix). The issue only seemrf to occur when version 10.1.3 was installed as a new installation and not upgraded from a previous version (according to some people’s notes).
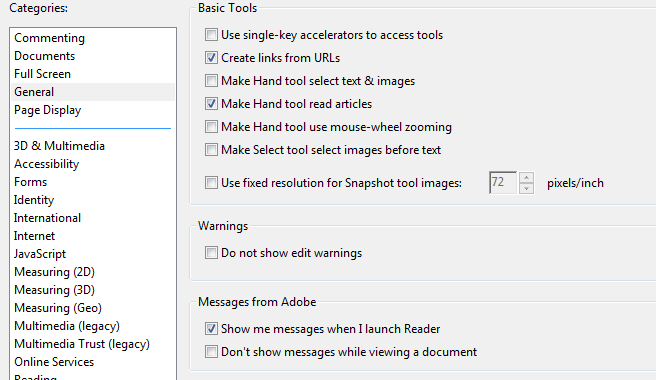
The Adobe Reader default install allows "Adobe to display in-product marketing messages while you work in the program". When you launch Reader. the "open recent documents" window that shows during launch includes ReaderMessages along the bottom of the window or may be displayed as you view PDFs. These message are downloaded from Adobe and probably stored in the ReaderMessages file stored within each user’s APPDATA portion of the profile. I'm guessing there is corrupt content in one of Adobe recent messages causing Reader to stay in memory or use high CPU once the application is closed. [more]
To stop the issue, disable the Messages from Adobe by modifying the following settings.
Note that the following settings are ‘per user’ and must be set by each individual user. To address the issue on a global level, consider doing the following:
Here are the registry key values that need to be set:

I was recently trying to factory reset a Cisco Express 500 switch for use at a customer site. I researched Cisco’s website and other websites, but nothing I tried would work. The basic steps are these:
Unfortunately, none of the online documentation I read mentioned the fact that this only worked when Windows XP was the operating system. Windows Vista or Windows 7 will not work. I did not find this out until after the fact when another engineer, who had also struggled with this issue, informed me that this was the case.
I recently travelled to a customer location wehre 80% of the employees use Windows XP Embedded Thin Clients. With the new XenApp 6 farm, it requires the latest version of the Citrix Client 12.0 or higher to be able to use all the functionalities of the new farm.
Now this became tricky as some older models (T20’s) had 512KB of Hard Drive space and 512KB of RAM. I was happy to see that the the newer versions, T30 and T40, both had 1MG. Adding to this storage surplus, all the images had Citrix plugins ranging from versions 10 to 11. We also wanted to help IT support out and install a Bomgar Button to these machines. [more]
After some trail and error we finally found a work around to the installation of the Thin Clients.
All these changes, had to be made in the administrator account and all changes required a reboot of the machine for the changes to take place. All in all, I believe I became a very thin client myself.
I recently needed to recover a long forgotten WPA encryption key from a friends Windows XP laptop. Unfortunately the wireless router password and the ISP credentials were MIA also, so changing the key or resetting the router were not options. After some searching I found WirelessKeyView from Nirsoft (http://nirsoft.net/utils/wireless_key.html). This is a simple EXE download that displays the WEP or WPA key for all networks on the laptop. For Windows XP it can only get the 64 digit hex key because XP doesn't save it in clear text. However this will work fine when joining the network. On Windows Vista and Windows 7 it will retrieve the key in ASCII.
A customer who does CPA work, was getting errors submitting tax returns electronically. They were instructed to install an update to install the new forms needed. During the installation by one of the employees, it stopped responding and only half installed. They had been instructed to reinstall the old version over the current install then run the update again. I was asked to perform the procedure.
Every time I attempted to re-install the older version it would hang and then give me an error that it was the wrong operating system. I attempted the install from a Windows 2003 and Windows XP system which is how it is normally installed. After consulting with ProSystems support found that the problem was that the Microsoft installer was trying to run with the installation. The tech said “right after starting the install, open the task manager and kill any instances of MSIEXEC.exe that is running”. I did this and the install ran without any problem. I then apply the updates and it installed the needed updates, using the built in update agent, without any issues.
The nice thing is that when I asked the tech if this was documented anywhere, his response was “nope”.
A local IT support customer who does CPA work, was getting errors submitting tax returns electronically. They were instructed to install an update to install the new forms needed. During the installation by one of the employees, it stopped responding and only half installed. They had been instructed to reinstall the old version over the current install then run the update again. I was asked to perform the procedure. Every time I attempted to re-install the older version it would hang and then give me an error that it was the wrong operating system. I attempted the install from a Windows 2003 and Windows XP system which is how it is normally installed.
After consulting with ProSystems support found that the problem was that the Microsoft installer was trying to run with the installation. The tech said “right after starting the install, open the task manager and kill any instances of MSIEXEC.exe that is running”. I did this and the install ran without any problem. I then apply the updates and it installed the needed updates, using the built in update agent, without any issues.
The nice thing is that when I asked the tech if this was documented anywhere, his response was “nope”.
Quite frequently on information security audits we find machines where group policies have been applied incorrectly or not at all. The IT administrator swears the policy is working, but the policies haven’t always taken on machines. What we can do in that situation for Windows XP machines is use GPupdate.exe, Rsop.msc, and GPresult.exe to find out more information. [more]
GPupdate
After you make changes to group policies, you may want the changes to be applied immediately, without waiting for the default update interval (90 minutes on domain members and 5 minutes on domain controllers) or without restarting the computer. To make this update, at a command prompt, run the Gpupdate.exe utility.
RSoP
The Resultant Set of Policy MMC snap-in has a nice interface and is easily used. Just go to Start, Run and enter rsop.msc. This will flash up a quick screen with a summary of the environment it’s processing.
When the progress reaches 100%, it will pull up a report for the policies upon which the computer and the user are having applied. You can browse the list, which mirrors the Group Policy Management Console, and see which policies the machine is seeing, which might not quite match what you’ve set in the Active Directory server.
You can also use this to diagnose any errors. For example, if a software deployment isn’t coming through for some reason, you can verify that it has access to the policy and has received the command. You can also see any related errors to help your troubleshooting.
GPResult
Starting with Vista SP1, RSoP no longer shows all of the group policies that a computer might have being applied to it. Instead, Microsoft recommends that you use the command line tool GPResult. Just open the Command Prompt and type: gpresult
Being a command line tool, it opens up the possibilities to include it in scripting. There are a large number of options you can use with GPResult to get exactly what you want. You can use it to create a nicely formatted HTML or XML report and you can also use it to run remotely on another system and as a different user (provided you know the password).
To find a "lost" window (displays off the side of the screen after undocking from multiple monitors):
XP: Right click the icon on the taskbar, select "move", then use the arrow keys to move the window to where it is visible.
Windows 7: Hover your mouse over the icon on the task bar until the thumbnail appears, right-click the thumbnail, select "move" and then move the window with the arrow keys. Alternately, you can click the icon on the taskbar (so that the application has focus), hold down the Windows key, and press the right or left arrow key. This will snap the window to the side of the screen. (Sometimes, you have to hit Windows-arrow multiple times.) [more]
Windows 7 has "mouse gestures". You've probably seen what happens when you drag a window to the top of your screen, but try grabbing a title bar and giving your mouse a shake. It will minimize all other windows (or bring them back if you just minimized them that way).
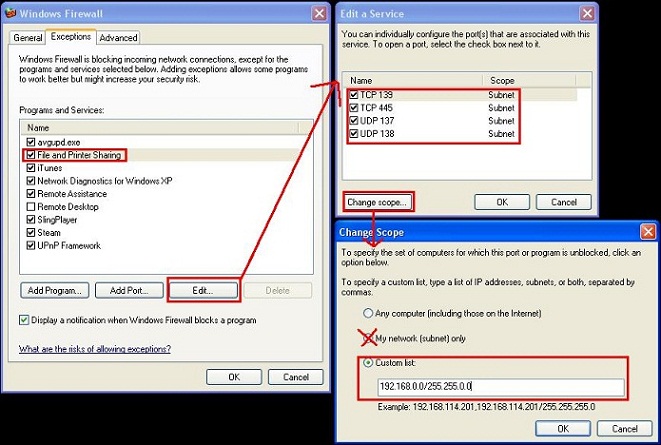
I needed to have access on a branch PC on another subnet (192.168.2.0) from the main site’s subnet (192.168.1.0).
Using remote desktop, I turned off Windows Firewall on the PC and could access the C$ share on the remote PC from the main subnet.
Looking at the Windows Firewall exceptions, I could see that File and Printer Sharing was already checked. I clicked edit and saw the required ports defined here. When I clicked “Change Scope”, I saw that it was set to “My network (subnet) only”. For all four entries, I changed the scope to use a custom list that encompassed all 192.168.x.x networks and was able to browse the C$ share from all subnets. [more]
