Blog: Windows 10

I ran across an issue where I was trying to delete a file and kept getting several errors while attempting to delete said file.

1. Permissions issue --- Received an error that I needed permission from File owner to be able to delete. I made myself the owner of the file and attempted to delete the file. That introduced error #2 listed below.
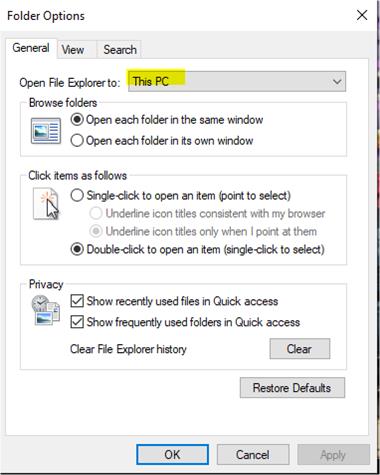
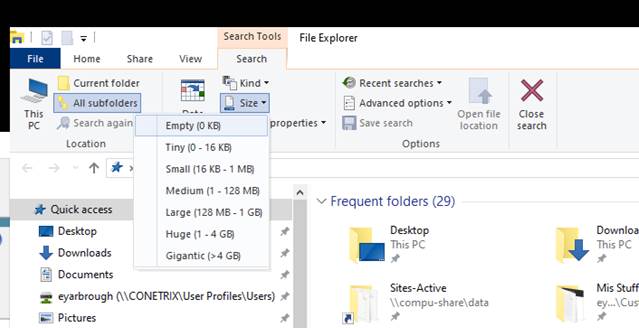
2. Directory is not Empty --- After resolving the permissions issue I began to receive an error that indicated the folder was not empty "Cannot Delete folder: The directory is not empty". So I went into make sure 'view hidden files' was checked in file explorer and it already was, yet the file in question still showed to be empty when opening it. Did some research and discovered that you can change the search options to include all subfolders and also to allow searching for files that are 'Empty' see screenshot below. After searching in this manner I was able to view a ton of subfolders that were sometimes 4 or 5 levels deep, and inside of those deeper folders, there would be data, which introduced error #3 to follow.

3. Filename too long --- The final error I was receiving indicated that the filename was too long. "The file name(s) would be too long for the destination folder…" This is the result of embedded file paths that end up surpassing the 255 character limit. Typically what you'll come across is filename\filename\filename\filename\filename\filename\filename or you might see filename\filename\realllyyyllllonnngggfilename\. Some suggestions for fixing this are to find one of the directories that seem to include the long string of characters and rename the folder. That didn't always work. 

A more common suggestion is to navigate a good way into the long directory path (filename\filename\filename\filename\filename\filename\filename) and then share out one of the folders. Map to the newly shared folder and then delete everything inside. After that you should be able to delete this directory itself, and the root directory that this folder lives in. This solution was actually working, but with so many files to navigate through, this was very time consuming and not really practical for my situation.

What I ended up using as the actual solution was a robocopy script with the /purge switch. Basically you create an empty folder somewhere, and use that as the source folder during the robocopy. Script will end up looking like this:
Robocopy EmptyFolderPath FolderToDeletePath /purge
Robocopy will cycle through and purge, or delete anything in the destination folder that is NOT in the source folder. Since the source folder in this case is empty, all files will be deleted. Please note you will need to run this through and elevated cmd prompt.


Windows released a tool called Windows Configuration Designer.  This allows you to automate new PC deployments. It can automatically uninstall all of the bloatware installed on the PC, skip the setup screen at the start, join the domain, and install programs. It will also allow you to place the PC in the correct AD organizational unit, allowing GPO's to apply instantly to the PC. After you configure a USB drive, all you have to do is plug in the USB to the new PC, and turn the pc on. WCD will do the rest for you.

https://docs.microsoft.com/en-us/windows/configuration/provisioning-packages/provisioning-install-icd  


When removing unwanted Windows 10 Apps via Powershell scripts, the process for removing it for all users deletes the AppXPackages from C:\Program Files\WindowsApps. This is normally the intended process, however, most scripts used to remove these use shorthand names such as "Netflix" to find the package label of the appxbundle then using the full path found, delete it. The reason the shorthand is used is because every major release of Windows 10 (1809, 1903, etc) changes these packages. This shorthand method has at times removed packages unintentionally. In order to add the package back you need to find the .appxbundle and .xml of the exact version of Windows 10 you are using. An in place upgrade can be done to replace the missing packages, however, remotely that's not always a feasible/safe option.
 
Microsoft has a Windows 10 Inbox Apps ISO for each available Windows 10 version. These can be found on the Microsoft Volume Licensing Service Center. In order to reinstall the package use the following steps.
  • Mount ISO
    • Mount the ISO or UNC path with Packages to be added.
    • Open Powershell as Admin
    • Run powershell command: Add-AppxProvisionedPackage -Online -PackagePath <path to .appxbundle> -LicensePath <path to .xml>
      • Add-AppxProvisionedPackage -Online -PackagePath "D:\x86fre\Microsoft.WindowsCalculator_8wekyb3d8bbwe.appxbundle" –LicensePath "D:\x86fre\Microsoft.WindowsCalculator_8wekyb3d8bbwe.xml"


I was working with a Windows Surface where the user would open File Explorer from the taskbar and it would freeze.  The window showed the message "Getting Things Ready" and would never open.  
 
The first time I looked at this, I ended up deleting all of the user's quick access history thinking there was corruption somewhere.  This resolved the issue for about 3 weeks until it returned.
 
I was able to right click on the Windows logo, click run, and open C:\ with no issues loading the file explorer window.  Clicking on quick access had no issues, as long as I didn't open file explorer from the taskbar.
 
The fix for this is to open file explorer as previously mentioned to the C:\ through run command, go to view, and click options.  In the general tab is a drop down that says "Open File Explorer to: "Quick access" or "This PC".  
 
Changing the setting from "Quick access" to "This PC" resolved file explorer freezing when opened from the taskbar.


We've had some frustrations with end users shutting down their machines accidentally at end of day, causing updates and software pushes after hours to fail. We wanted users to have the ability to restart, and for administrators to be able to shut down machines if needed. We investigated a few options using group policy and user rights assignment, but both options ultimately did not work out because it removed the ability for the user to restart their machine.
 
After some research, a recent post in a Citrix forum made a note of a new registry hive that was released with either the 1703 or 1709 build of Windows 10 that allows for way more granularity when it comes to managing the desktop interface. This includes a key specifically for only removing the shutdown option from both the "Shut down" or "Sign out" menu and the Power menu.
 
 
The registry hive can be found (or created) under HKEY_LOCAL_MACHINE\SOFTWARE\Microsoft\PolicyManager\current\device\Start


You can run the following command from a Windows command prompt to remove an app for all users that will login to the PC.  This should be done before deploying the PC and will not remove the apps for users that have already logged in. This command removes Solitaire as an example.
 
powershell -command "Get-AppxPackage -AllUsers -Name *solitaire* | Remove-AppxPackage -ErrorAction SilentlyContinue"
 
You can also run a similar command as the user to remove the app for that user. (Just remove the "-Allusers" string and add the "-windowstyle hidden" string)
 
powershell –windowstyle hidden -command "Get-AppxPackage -Name *solitaire* | Remove-AppxPackage -ErrorAction SilentlyContinue"
 
You can include commands for several different apps into a single script and run that on the PC or as the user at login.


After updating a laptop to Windows 10 1803, I had a user who could no longer right click within a RemoteApp window.  I found a suggestion to disable the group policy for "Use advanced RemoteFX graphics for RemoteApp". After disabling that policy and having the user log off/on, the user was able to right click within the RemoteApp window again.


After installing each Windows 10 creator's update, I get the following error message when I try to click on any link in any email message or click on a table of contents link in a Word doc:

It's not an entirely bad thing to have email links require a copy and paste but it's a real problem with other links like the Table of Contents in a long Word document.

There is a KB article at https://support.microsoft.com/en-us/kb/310049 that discusses this issue. The solution for Windows 10 is to find a system that doesn't have the problem and export a registry key then import it into the offending system. The key it references gets deleted each time a new creator's update is installed.

HKEY_LOCAL_MACHINE\Software\Classes\htmlfile\shell\open\command

Then you export the subkey to a file, copy the file to the system having the problem and import it into that system's registry (either by double clicking the .reg file or importing it via regedit). There is a last verification step to verify the String (Default) value of "HKEY_CLASSES_ROOT \.html" key is "htmlfile".

That was several steps it took to make my system less secure. It's usually the other way around!