Blog: Windows Vista

When installing or making changes to the Symantec Endpoint Protection client, be aware that the SEP firewall policy can cause Windows Firewall to 'reset' or change its configuration.  I've seen several versions of Windows OS change to an active firewall config with no exceptions under the following 2 conditions: [more]

  • SEP client with an enabled, default firewall policy is installed for the first time
  • Existing SEP client has its applied firewall policy withdrawn

This has been seen with several 11.0.6x builds of SEP, although it may be applicable to other builds as well.  This occurs even though the SEP firewall module (Network Threat Protection) is not installed.  When a Windows desktop has its firewall enabled with no exceptions and there is no group-policy in place to re-apply a previous config, it may become unreachable remotely via any protocol, while at the same time the user may notice no change and continue working normally.  If the Windows client happens to be a server, all connectivity to that server may be lost, except via console.

I suggest rolling out new SEP clients after the firewall policy in that group has already been withdrawn.  For existing clients where the firewall policy needs to be withdrawn or disabled (ie overriding Win7 firewall config), test a small subset of clients in a separate group before making the change to normal production groups.

 

For researching disk space usage I usually recommend the windirstat program (http://windirstat.info).  One problem I had recently is related to the fact that no user, not even an administrator has access to the "System Volume Information" folder.  This folder contains the system restore points (on the C: drive) and probably other system stuff that you should not mess with. 

Since the tools we use to investigate disk space usage do not have access to "System Volume Information" folder, that folder is just missing from the display given.  However, windirstat has an option to turn on the display of "Missing" space.  This section will show the difference of the size of the disk minus the total of all files found.  A Windows Vista machine at a customer site was running out of space and this missing space was taking up most of it.  System Restore was enabled and the help text said it could take up to 15%.  I turned system restore off, rebooted, and the space came back.  I turned it back on, checked it a couple of times over the next week the "Missing" space did not seem to be growing.


One of our IT consulting customers using a Windows 7 laptop was experiencing a problem with access mapped drives while connected to their company using VPN.

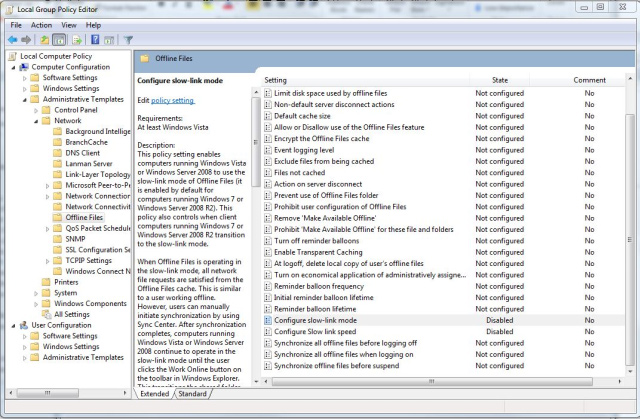
Doing some research I found that Windows 7 and Vista both have what's called "slow link mode".  The behavior is that if the latency of the network connection exceeds 80 milliseconds (ms), the system will transition the files to "offline mode".  The 80 ms value is configurable using a local group policy edit.

  1. Open Group policy (start -> run -> gpedit.msc)
  2. Expand "Computer Configuration"
  3. Expand "Administrative Templates"
  4. Expand "Network"
  5. Click on "Offline Files"
  6. Locate "Configure slow-link mode"
  7. This policy can either be disabled or set to a higher value for slower connections.

Note – The "Configure Slow link speed" value is for Windows XP Professional. [more]

Additionally, there is a registry value that can be added that can force auto reconnection...

When a server has been unavailable (offline mode) and then becomes available again for connection, Offline Files Client Side Caching tries to transition that server to online mode if all the following conditions are true:

  • There are no offline changes for that server on the local computer.
  • There are no open file handles for that server on the local computer.
  • The server is accessed over a "fast" link.

You can adjust the definition of "slow" and "fast" by using the SlowLinkSpeed Offline Files policy. With this, you can configure Offline Files Client Side Caching to ignore these conditions and transition the server to online mode regardless of whether these conditions exist. To do this, follow these steps:

  1. Click Start, click Run, type REGEDIT, and then click OK.
  2. Locate and click the following registry subkey:
    HKEY_LOCAL_MACHINE\Software\Microsoft\Windows\Curr entVersion\NetCache
  3. Click Edit, point to New, and then click DWORD Value.
  4. Type SilentForcedAutoReconnect, and then press ENTER to name the value.
  5. Double-click SilentForcedAutoReconnect.
  6. In the Value data box, type 1, and then click OK.

Finally, here is a link to a Microsoft TechNet article explaining how Vista/7 handles offline files.  At the bottom of the article is a procedure for disabling offline files completely using a Group Policy Object.  http://technet.microsoft.com/en-us/library/cc749449%28WS.10%29.aspx


I recently wanted change the offline files cache location in Windows 7.  Instead of the default location of C:\Windows\CSC, I wanted the offline files to be stored on my D: drive.  After checking around the Internet, I found several articles stating that moving offline files worked in XP, but didn’t work in Vista or Windows 7.  In the end, I found this blog post.  It worked.  However, I made one modification – I cleared the cache prior to moving the cache location and did not delete the original cache location after moving it.  My reasoning was 1) I wanted to clear the cache in order get rid of any residual offline files and 2) taking ownership and deleting a folder in the Windows directory seems like asking for trouble (besides I might need to move the cache back at some point). 

In order to clear the cache, add a DWORD registry key named FormatDatabase to HKLM\System\CurrentControlSet\Services\CSC\Parameters, set the key to a value of 1, and reboot.  One word of warning, do not set both the FormatDatabase registry key and CacheLocation registry key mentioned in the blog at the same time and reboot.  Windows blue screened on me during the reboot.  I had to boot into safe mode and remove the CacheLocation registry key in order to avoid the blue screen.  The correct sequence is clear the cache, reboot, change the cache location, reboot.


While debugging a problem that required uploading files to a website, one of the files started getting an error at the start of the upload instead of at the end.  This didn’t make sense because the problem being debugged was after the file was uploaded to the website.  This looked like another problem instead of the original problem we were hunting.   We suspected that the problem was connected to the file being uploaded instead of the website.  When we looked for the file on the Desktop it wasn’t there.  This was odd.  Went back to Internet Explorer and the file was displayed in Internet Explorer’s  file dialog.   But the file was not on the Desktop.  We tried closing Internet Explorer and restarting, but Internet Explorer still showed the phantom file. 

It turns out this is an artifact of Internet Explorer’s sandbox implementation on Vista or Windows 7.  Under certain conditions Internet Explorer writes to a virtualized Desktop folder located on the file system at: C:\Users\xxx\AppData\Local\Microsoft\Windows\Temporary Internet Files\Virtualized\C\Users\xxx\Desktop.  If you have need to move or remove the files in the “Virtualized” directory, the easiest solution is to open the file browser dialog in Internet Explorer and then move or delete the files from inside that dialog. [more]

More information is available in a article by Mark Russinovich: http://blogs.technet.com/markrussinovich/archive/2009/02/03/3174194.aspx


Bomgar allows us to work on our customer’s desktop if they have an Internet connection. A small applet is installed on their desktop when the session is started and de-installed at the conclusion of the support session. However, with UAC on Windows 7 and Vista, it is frequently a frustration for us to work at the administrator level on their computer. There is a little icon at the top of the screen presented after the connection is established that will alleviate this issue. The following uTube video describes how to instantiate this feature: [more]

www.5min.com/Video/Bomgar-Training-06-Remote-Vista-Support-and-Elevate-to-Admin-39200366


While working at a customer site a couple of users reported Word 2007 has no page number gallery when you go Insert -> Page Numbers. After investigating I found that just deleting the Building Blocks.dotx file in their profile fixed the problem.

Windows XP Location:
c:\Documents and Settings\{your username}\Application Data\Microsoft\Document Building Blocks\1033\Building Blocks.dotx

Windows Vista & 7 Location:
c:\Users\{your username}\AppData\Roaming\Microsoft\Document Building Blocks\1033\Building Blocks.dotx


I upgraded from Vista to Windows 7 about three weeks ago.  I decrypted my PGP encrypted drive before the upgrade and, after the upgrade, PGP recognized my disk wasn't encrypted and prompted me to encrypt my drive.  I started the encryption process but wound up pausing the process because of slow performance, intending to resume it after hours.  I installed some Windows and Lenovo (ThinkDamage…probably my 2nd mistake) updates which required a reboot.  After the reboot, PGP started trying to install itself and produced this error message…

"You cannot upgrade or remove PGP while a whole disk is processing. Installation terminated." [more]

I was unable to access the PGP console in order to resume the encryption, decrypt, etc.  An attempt to uninstall PGP produced the same error.  This was not good since I was scheduled to leave town on an audit within 24 hours and thought I might have to abandon the upgrade to Windows 7, restore a backup and re-encrypt the old Vista image before I left town.

A coworker suggested I log a ticket with PGP.  After doing so, I was poking around their site, searching for various terms from the error message and stumbled across a reference to a command line command.  About that same time, I received an auto-response from PGP which included several links, the last of which led me to information about the same command line command, pgpwde.

Here is the relevant section from the page above:

SECTION 2 - PGPWDE Command Line

The following commands will help diagnose and decrypt the disk. Other commands can be listed by typing pgpwde --help.

  1. To begin working with the PGPWDE interface open a command prompt and change to the PGP installation directory (default directory shown) C:\Program Files\PGP Corporation\PGP desktop.
  2. To list all installed hard disks in the system type: pgpwde --enum. Entering this command will give us a list of disks with numbers we will use in the next few steps.
  3. Now type pgpwde --status --disk 1. Substitute the PGP WDE disk number listed in the previous step for the number 1 in the command if different. The output of this command will tell us whether the disk is still encrypted.
    • If the disk is not encrypted, "Disk 1 is not instrumented by bootguard" will be the output.
    • If the disk is encrypted, the output will display:
      • "Disk 1 is instrumented by Bootguard."
      • The total number of sectors.
      • A Highwater value (number of sectors encrypted).
      • Whether the current key is valid.
  4. Type pgpwde --list-user --disk 1. This will tell us the user information contained on the disk. This will help in multi-user environments to determine which user passphrase was used to implement WDE.
  5. Type pgpwde --decrypt --disk 1 --passphrase {mypasswordhere}. This will start the decryption process. To view progress, type the status command listed in step 3 and note the Highwater number, this number will get smaller and smaller as the number of sectors encrypted decreases.

This command line command allowed me to decrypt the partially encrypted disk.  I then uninstalled PGP to be safe, reinstalled PGP and encrypted my disk without further incident.


We had an issue where one of our customers could not synchronize any of his files on his laptop (the last time he tried was over three months ago). He continued to get an error saying “Access Denied” for each of the offline files he was trying to synchronize. After some troubleshooting I found that the error went away if the offline file encryption was turned off. Why was this causing the errors? Well after doing some more research I checked the group policy setting located under “Computer Configuration\Windows Settings\Security Settings\Public Key Policies\Encrypting File System” and sure enough, the certificate there had expired around 3 months ago. [more]

I had to generate a new certificate using the command “cipher /r:file_name” from the windows command prompt and then use the generated certificate to replace the expired one in the group policy. During the process of making some of these changes his offline file settings could not be changed, several of the buttons were grayed out and you could not select additional files to be used offline.

In order to fix this I had to clear the offline file cache. In order to do this in Windows Vista you have to create a new dword in HKEY_LOCAL_MACHINE\SYSTEM\CurrentControlSet\Services\CSC\Parameters called FormatDatabase and set the value to 1, then reboot the computer. Afterward all of the offline file cache will be removed. This also fixed the problem with not being able to add new offline file items.


With Windows Server 2008, Windows Vista, and Windows 7 Microsoft changed the group policy template files to an XML format (.ADMX file extension).  These files are stored in the PolicyDefinitions folder under %systemroot%.   If you open the Group Policy Editor from a 2008 or higher system, it will automatically access these files on the local system.  However if you want to automatically have access to the templates across the network you can create a central store on a domain controller and they will be automatically replicated with other domain controllers in the domain.  Using this method I was able to make the newer Windows 7 ADMX files available on our 2008 domain controllers. [more]

http://technet.microsoft.com/en-us/library/cc748955%28WS.10%29.aspx