Blog: Windows 2008 Server

Starting in Windows 7 and Windows Server 2008 R2, Microsoft introduced sub-category configuration audit policies.  This provides administrators with added granularity when deciding which event logs are necessary to be logged.  More on  Advanced Audit Policies can be found here: http://technet.microsoft.com/en-us/library/dd772712(WS.10).aspx [more]

The following command will pull the configuration for all of the new advanced security audit policies:

audipol /get /category:*


You can install snap-ins to PowerShell in order to extend the functionality.  Examples include the PowerCLI for VMware and the Exchange snap in.  Basically, these snap-ins include libraries of additional commands that you can use to perform automation.  However, if you simply create powershell scripts (.ps1 files) with these commands, you will get errors because the default enironment does not include the snap in(s).

To add a snap in to the powershell environment automatically, you use a powershell script that is invoked every time you start powershell.  This is the profile.ps1 file, located in C:\Windows\System32\WindowsPowerShell\v1.0.  You may have to create the profile.ps1 file, as it is not needed for the default environment.

One syntax to add a snap in to the default environment is this:

$VMCore = Get-PSSnapin VMware.VimAutomation.Core -EA 0
if ( -not $VMCore ) { Add-PSSnapin VMware.VimAutomation.Core }

You can find examples of other syntax online, but the core behavior is this:  Check if the snap in is active, and if it isn't there use the Add-PSSnapin commandlet to add it.

Caveat:  You must download and install the snap in on your system before you can add it to your default PowerShell environment.  For example, the VMware.VimAutomation.Core is installed with the PowerCLI software from VMware.

Note:  I have added the VMware automation snap in to the default environment on the Security Bank management servers.  Additionally, I've put a script on these servers that will check for any VM snapshots.  (D:\cnx\scripts\List_Snapshots.ps1)


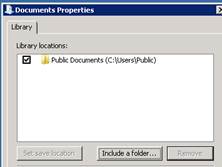
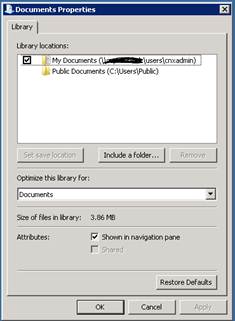
Libraries in Windows 7 and Server 2008 by default contain the Public Documents and My Documents location. I was working with a user who’s documents were set with a group policy. This user had an odd configuration, in that his documents were in a different location than the other users. After moving his documents to a new location, they still showed up in his Documents library. I decided to remove the old documents folder that points to the old network location. After removing the old documents folder and correcting the group policy that was applying the settings, his Music/Pictures/Movies were all pointed to the new location, but his Documents only showed the Public documents. [more]

After much searching, I decided to click “Restore Defaults”. This immediately fixed the problem.

The GotCha is that the My Documents Library is a single location for the files, no matter where the folder is pointed. When I hid the old documents location, it remained hidden until I restored the folder to defaults.


There was a customer that had been migrating printers from Windows 2003 SBS Domain Controller/Print Server to Windows 2008 and somehow in the process accidentally deleted all of the shared printers.  When this happened, all printing at the company came to a halt.  There were almost 20 different printers that had been deleted including all the share names, printer ports, specific settings, etc.  It was going to be next to impossible to try and recreate the printers exactly as they were within a decent amount of time.

The customer had VEEAM backups of the system drive, but we decided that restoring the entire drive would most likely be a BAD idea on a Domain Controller.  Our preferred plan at this point was to try and merge the printer registry keys from a backup into the current registry.  From VEEAM, we restored the C:\Windows\System32\Config folder to an alternate location.  This folder contains the registry files named SYSTEM, SOFTWARE, etc.  TIP: If you do not have backup of the files, you may be able to find copies of registry files in C:\Windows\Repair folder.  Just make sure and look at the timestamps of the modification dates to see if they might be usable. [more]

What we concluded before beginning was that local printers were stored in the registry at HKLM\SYSTEM\CurrentControlSet\Control\Print\Printers.  The actual printer shares and security settings were stored in HKLM\SYSTEM\CurrentControlSet\services\LanmanServer\Shares.  At this point make sure you backup the current registry by doing an export.

Using the LOAD HIVE method in the registry, we mounted our SYSTEM file as SYSTEM_Backup under HKLM.  However, the CurrentControlSet subkey was not there.  Instead it only had CurrentControlSet001 and CurrentControlset003.  Also, the Printers subkey was missing in both CurrentControlSet001 and 003.  The reason CurrentControlSet is not there is because it is simply a pointer to CurrentControlSet001.  You can verify this by looking at the HKLM\SYSTEM\Select subkey. 

The main problem was that we had no idea where the Printers subkey was.  I had a feeling that it was also dynamically linked from somewhere else in the registry, so I created a new printer with a unique name as a test and did a registry search.  I found what appeared to be all of the printer settings in HKLM\SOFTWARE\Microsoft\Windows NT\CurrentVersion\Print.  Now, I went back and loaded the SOFTWARE file as SOFTWARE_Backup under HKLM.  When I looked in the Print subkey, I saw all the missing printers.  It appears that this location is linked with the missing Printers subkey under Control\Print.

Now to get the data we need for all the printers and the shares, I exported HKEY_LOCAL_MACHINE\SOFTWARE_Backup\Microsoft\Windows NT\CurrentVersion\Print and HKEY_LOCAL_MACHINE\SYSTEM_Backup\ControlSet001\Services\lanmanserver from the loaded registry hives.  After that is done, unload the backup hives as they are no longer needed. 

Right click your two exported .reg files and open with notepad.  Do a replace on SOFTWARE_Backup with SOFTWARE and the same for SYSTEM_Backup with SYSTEM in the appropriate files.  After that, the registry files are ready for merging.  Right click the .reg file and select "Merge."

After we merged the registry files, we thought we may have to reboot to get the printers to appear, but simply restarting the Print Spool service made the printers reappear like magic.


From time to time our IT auditors sync offline files back to the server and a file gets corrupt.  The corrupt file is typically 0 KB and is impossible to remove/change permissions/take ownership/etc.  I did some research the other day on how to remove these files.  One of the first "solutions" I came across was to reboot the server into Safe Mode and remove the file that way.  That was incredible unpractical, so I continued searching.  The next solution I came across was so simple it seemed ridiculous… but I tried it anyway… and it worked.  :-)  The solution was to rename the file's parent folder, then rename it back to the original name.  This procedure allowed the file to safely pass over to Elysium.


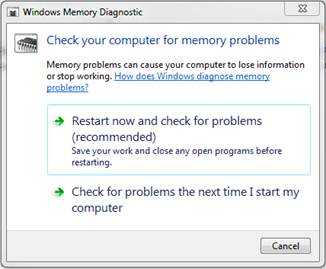
Typically, we run memory diagnostics from a bootable CD, but if you are trying to troubleshoot a computer in another city this is not always possible. Windows 7, Vista, Server 2008, and Server 2008 R2 have a built in utility called mdsched.exe. The utility can be started from a Windows session and will start automatically at the next reboot. The default is a simple memory diagnostic, but extended testing can be performed. Results will display during the test, on screen after the test, and in the Event Viewer under Applications and Services > Microsoft > Windows > MemoryDiagnostics-Results > Memory Diagnostic Tool  after the test is complete.
More detailed information can be found here: [more]

http://www.sevenforums.com/tutorials/715-memory-diagnostics-tool.html


Robocopy that ships with Windows 7/2008 seems to have a bug. If you specify /MT (for multiple threads), it forces /E (copy empty directories).  This causes it to run much more slowly.  Even if all the destination directories have already been created, it still accesses each one.  If copying over a relatively slow connection,  it can be very slow if you use /MT. [more]

Some discussion is here: https://social.technet.microsoft.com/Forums/en-US/w7itprogeneral/thread/155d47ea-2523-4343-80dc-f0a987971b62


I had been troubleshooting a failed vCenter upgrade recently and trying to restart the upgrade process. Every time I would run the installer, it would fail on some piece and rollback the install. I had opened up several windows trying to figure this out, including Event Viewer, Services.msc, log files, etc. and wasn’t easily able to find a reason for the failures. At one point, the error that I was getting was something about permissions denied; which was strange, as the account I was using had full admin rights on the system and SQL server.

I found an obscure posting on some forum somewhere that suggested closing down the services.msc window and then running the install again. I did so and the install was successful! I’ve never seen an application that had to have the Services.msc window closed in order to add or remove services, but some portion of this install process seemed to require it.


In working with XenServer over the past couple of months, I have found that information is harder to come by than it is with VMware. We are only using XenServer for one customer and they are using the free version so support is not an option. Up until last week, I had no need to get into the CLI of Xen much. It’s pretty easy to configure via XenCenter and our setup is pretty simple. However, the other day, our monitoring software detected an issue where the network interfaces on one of the monitored VMs was logging a high number of discards. One of the peculiar things was that the discards were the exactly the same for Tx and Rx. After some research, I decided that it would be a good idea to run off all the offloading features in XenServer. XenServer sees network interfaces in two forms: physical interfaces (pifs) and virtual interfaces (vifs). Pifs are the actual connections to the server. Vifs are the NIC interfaces of the VMs. Naturally, turning off all of this can only be done via the XenServer CLI. So, part one of the gotcha…here is a set of scripts that can help in manipulating network interfaces in Xenserver
 
Script to turn off all offloading techniques off on all vifs and pifs: [more]
====================================================
#!/bin/bash
 
if_modes="rx tx sg tso ufo gso"
 
if [[ "$1" == "--local" || "$1" == "-l" ]]; then
echo -n "disabling checksum offloading for local devices... "
for iface in $(ifconfig | awk '$0 ~ /Ethernet/ { print $1 }'); do
for if_mode in ${if_modes}; do
ethtool -K $iface $if_mode off 2>/dev/null
done
done
echo "done."
else
echo -n "disabling checksum offloading in xapi settings... "
for VIF in $(xe vif-list --minimal | sed -e 's/,/ /g')
do
###xe vif-param-clear uuid=$VIF param-name=other-config
for if_mode in ${if_modes}; do
xe vif-param-set uuid=$VIF other-config:ethtool-${if_mode}="off"
done
done
for PIF in $(xe pif-list --minimal | sed -e 's/,/ /g')
do
###xe pif-param-clear uuid=$PIF param-name=other-config
for if_mode in ${if_modes}; do
xe pif-param-set uuid=$PIF other-config:ethtool-${if_mode}="off"
done
done
echo "done."
fi
====================================================
- create text script file (turnOffloadingOff) using VI
- Change perms to make it a script
                        chmod 777 turnOffloadingOff
- Run script
                        ./turnOffloadingOff
 
Other Useful XenServer Commands
 
- determine uuids of physical interfaces on XenServer
                        xe pif-list host-name-label=<hostname>
- determine parameters of the specific pif given the uuid
                        xe pif-param-list uuid=<uuid of pif>
- determine uuids of virtual interfaces of VMs on Xenserver
                        xe vif-list
- determine parameters of the specific vif given the uuid
                        xe vif-param-list uuid=<uuid>
- new VMs created since the script was executed will NOT have the same vif other-config settings disabled
xe vif-param-set uuid=<uuid of vif> other-config: ethtool-gso=”off”
xe vif-param-set uuid=<uuid of vif> other-config: ethtool-ufo=”off”
xe vif-param-set uuid=<uuid of vif> other-config: ethtool-tso=”off”
xe vif-param-set uuid=<uuid of vif> other-config: ethtool-sg=”off”
xe vif-param-set uuid=<uuid of vif> other-config: ethtool-tx=”off”
xe vif-param-set uuid=<uuid of vif> other-config: ethtool-rx=”off”

So on to part two of this post…this didn’t fix the problem. After a ton of additional troubleshooting, I determined that this behavior is due to the Citrix Paravirtual NIC driver. The issue goes away if you uninstall XenTools and the PV driver isn’t used. On Windows 2008 and Windows Vista/7 VMs, the PV Ethernet driver reports discards to the OS. In Windows 2003 and XP, it does not. Keep in mind the discards could be broadcast packets not intended for the VM or misc DOM0 traffic. In any case, it doesn’t make much sense, but there isn’t actually anything wrong with the VM. I ended up removing the monitoring of the VMs NIC interfaces because I did want to use the PV Ethernet driver.


I was building a new Server 2008 machine for a customer a few weeks ago. After installing the OS, I decided to activate the OS. I was told  I would have to activate over the phone because Internet activations do not work from the office. Before I could activate though, I needed to change the product key to the customer’s key. When I typed in the new key, I received an error stating “Invalid product key”. I decided to call Microsoft. They verified the key was correct several times in different departments. I was told it might be a key/media mismatch. So I reinstalled and immediately tried to change the product key again. It again gave me the same error. I was finally told that keys generated after SP2 was released would not be recognized as valid until the system was running SP2. I installed SP2 and the key activated without a problem.