Blog: VPN

When a secondary public IP address is utilized for VPN connections, the configuration of an IPSEC VPN versus an SSL VPN is quite different.  For an IPSEC VPN, it's as easy as turning flipping a switch and selecting the IP address:  

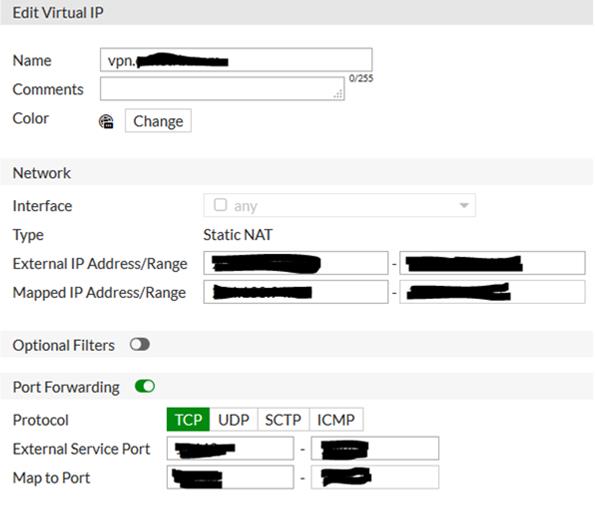
For SSL VPN it takes a couple of steps: First a Virtual IP (VIP) has to be created that points the primary IP at the secondary IP.  Additionally include port forwarding for the SSL port to be utilized:  

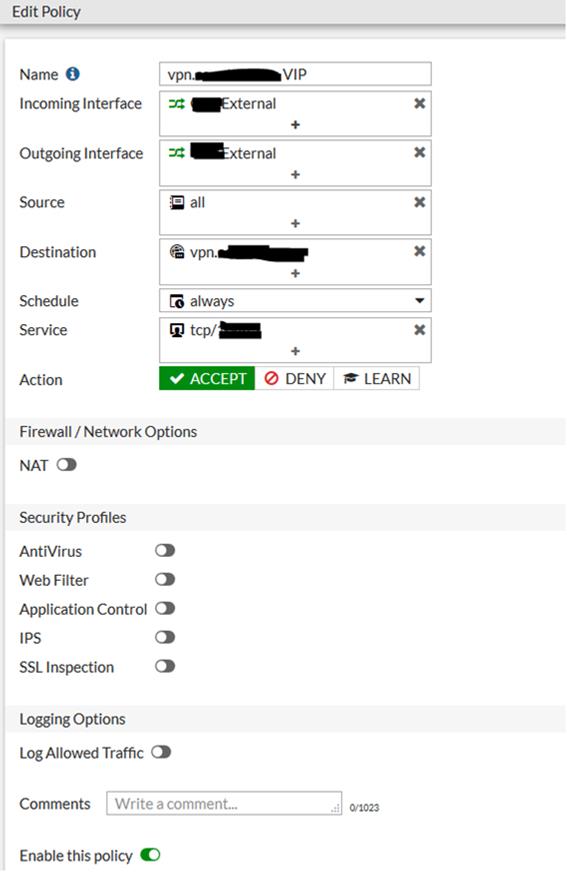
Second, an IPv4 policy needs to be created using the WAN interface for both incoming and outgoing, with the destination being the VIP:


We recently moved a customer from a datacenter at one of their locations to a large datacenter in the Dallas/Ft. Worth area. One of the devices we moved was a Meraki MX84 being used as a VPN concentrator. A VPN concentrator works by extending the network the VPN concentrator is on to the access points. Basically, wireless clients at all locations get an IP address on the same layer two network. This is important for a few reasons. First, the VPN concentrator needs to be in it's own VLAN/DMZ. Second, something on the layer two network the VPN concentrator is connect to needs to be handing out DHCP addresses. In our case, we used a Fortigate UTM to run the DHCP server for that subnet. Third, traffic needs to be allowed outbound to the Internet from all clients on the VPN concentrator layer two network so clients can connect to the Internet. The traffic is tunneled from the access points to the VPN concentrator, so the traffic does not intermix with the normal network traffic.

One of the issues we had was that the access points would not create the tunnel back to the VPN concentrator. After talking to Meraki support, we found that the issue was that the access points and the VPN concentrator would not connect to each other if their public IP address was the same. This does not work because Meraki uses the same technology to build the VPN from the MX to the access points as they use to build a VPN mesh between MX devices. Our devices were both using the default overloaded outbound NAT rule, so they were coming from the same public IP address. The solution is to make the MX come from a different public IP address, which can be accomplished via an inbound and outbound NAT statement. After we made this change, the access points connected to the VPN tunnel and wireless began to work.

One other thing to note is that the access points will not broadcast SSIDs if the VPN to the concentrator is not up when configured to tunnel traffic through a VPN concentrator. This can be helpful when troubleshooting wireless when there are not clients at the location of the access points.


Recently we've been experiencing a problem with the Cisco AnyConnect client disconnecting and reconnecting shortly after the initial connection is established. Originally we thought that this was a bug in the client. Cisco recommended switching to an IKEv2 connection profile, but the disconnect problem was never resolved, even with updated versions of the client. During a recent remote session with Cisco support, the root cause of the disconnects was discovered.

In later versions of the AnyConnect client, there are two protocols in use:  SSL and DTLS. DTLS is a variant of TLS that uses datagrams which are sensitive to delay. After authentication, the client attempts to negotiate a DLTS connection. If that negotiation is unsuccessful, the client disconnects and reconnects using SSL only. DTLS uses UDP port 443. In our test environment, the remote access firewall is behind another firewall that was only allowing TCP port 443 through. After updating the firewall rule to allow UDP port 443 as well, the disconnects stopped occurring.


I had been helping a vendor install Cisco VPN Client and the installation kept failing with “Error 27850.  Unable to manage networking component.  Operating system corruption may be preventing installation.”

As it turns out, there was other VPN software installed and bound to the local network adapter.  Windows 7 has a default maximum number of 8 network filter drivers it can have assigned to the network adapter. 

The image at the following link shows a good example of adding more than 8 network filters to an adapter: https://supportforums.cisco.com/thread/2015629#3067225

The maximum number of filter drivers for Windows 7 can be set to 14.  To increase the value from the default, the change must be done in HKEY_Local_Machine\System\CurrentControlSet\Control\Network\MaxNumFilters.  Increasing the value to 14 allowed the Cisco VPN Client installation to complete.


Cisco's IOS documentation says that pre-shared keys used for VPNs can be 128 characters long.  If you try to specify a 128 character key this message appears "Pre-shared key length exceeds 127 characters.   Key not added."  So, I have been using 127 character pre-shared keys for a long time.  Then IOS 15 came out and we are still doing VPNs just fine with that version, but not using 127 character pre-shared keys.  It still allows them but the VPN will not come up and "%CRYPTO-4-IKMP_BAD_MESSAGE" is logged, which means the keys do not match.  It now looks like the pre-shared keys cannot be longer than 125 characters.


While configuring a new Windows 7 laptop I attempted to setup a new VPN connection.  It kept defaulting to a dial-up connection. I verified the steps I was taking on my own Windows 7 laptop and then repeated it again, but it had the same results. I tried copying the VPN connection to the system and it still would try to use dial up. I tried setting up the VPN using the local administrator account, domain administrator account, and domain user account only to find the same results each time.  I even disabled and uninstalled the modem and it still default to dial up.

After some research, I opened the device manager, enabled the “Show hidden devices” option, and under “Non-Plug and Play Drivers” I found NDProxy with a yellow exclamation mark. [more]

NDProxy, according to Microsoft is "a system-provided driver that interfaces NDISWAN and CoNDIS WAN drivers (WAN miniport drivers, call managers, and miniport call managers) to the TAPI services" - see http://msdn.microsoft.com/en-us/library/ff568322.aspx for more details.  NDProxy has been linked to slow boot, BSOD and other issues in Vista.

To fix the problem right click on NDProxy and select properties, go to the second tab (Driver) and look at the “Current Status” section, it says it is “Stopped”. Choose the option to start it then reboot. (Do not change the startup type) After the reboot NDProxy will no longer have an exclamation icon (i.e. it started OK) and it shows “Started” in the “Current Status”.


One of our IT consulting customers using a Windows 7 laptop was experiencing a problem with access mapped drives while connected to their company using VPN.

Doing some research I found that Windows 7 and Vista both have what's called "slow link mode".  The behavior is that if the latency of the network connection exceeds 80 milliseconds (ms), the system will transition the files to "offline mode".  The 80 ms value is configurable using a local group policy edit.

  1. Open Group policy (start -> run -> gpedit.msc)
  2. Expand "Computer Configuration"
  3. Expand "Administrative Templates"
  4. Expand "Network"
  5. Click on "Offline Files"
  6. Locate "Configure slow-link mode"
  7. This policy can either be disabled or set to a higher value for slower connections.

Note – The "Configure Slow link speed" value is for Windows XP Professional. [more]

Additionally, there is a registry value that can be added that can force auto reconnection...

When a server has been unavailable (offline mode) and then becomes available again for connection, Offline Files Client Side Caching tries to transition that server to online mode if all the following conditions are true:

  • There are no offline changes for that server on the local computer.
  • There are no open file handles for that server on the local computer.
  • The server is accessed over a "fast" link.

You can adjust the definition of "slow" and "fast" by using the SlowLinkSpeed Offline Files policy. With this, you can configure Offline Files Client Side Caching to ignore these conditions and transition the server to online mode regardless of whether these conditions exist. To do this, follow these steps:

  1. Click Start, click Run, type REGEDIT, and then click OK.
  2. Locate and click the following registry subkey:
    HKEY_LOCAL_MACHINE\Software\Microsoft\Windows\Curr entVersion\NetCache
  3. Click Edit, point to New, and then click DWORD Value.
  4. Type SilentForcedAutoReconnect, and then press ENTER to name the value.
  5. Double-click SilentForcedAutoReconnect.
  6. In the Value data box, type 1, and then click OK.

Finally, here is a link to a Microsoft TechNet article explaining how Vista/7 handles offline files.  At the bottom of the article is a procedure for disabling offline files completely using a Group Policy Object.  http://technet.microsoft.com/en-us/library/cc749449%28WS.10%29.aspx


I was attempting to install SEP on a server that was local to me, but remote to the SEP manager. The problem here is that the SEP manager generates a 90 MB package before pushing it out to the machine and starting the install. This would’ve taken a good bit of time to copy over the VPN to the server here so I decided to take a different approach. I had the installation media for an unmanaged copy of SEP that I installed on the server. From there, I opened the SEP manager, went to clients, and exported the communications settings into a file I named “sylink.xml”. Then I copied the sylink.xml file to the server here and opened the SEP client. Inside Help & Support, click Troubleshooting, and then import communication settings. This tells the client where to look for management. After waiting for a minute or two, I went back into Troubleshooting and saw that the client was looking in the correct location for the server policies.


Cisco has a built in tool that allows you to test AAA server connectivity.  It is included in both the CLI and the ASDM.  This tool is useful when you are setting up a AAA server because you don't have to login and out of the device in order to test the connectivity.

The CLI command is:
test aaa-server authentication SERVERNAME [more]

After entering this command you will be prompted to enter the server IP address, and a username and password.

The packet-tracer command is another tool that comes in handy when testing access-lists and VPN configurations.  It simulates a packet that transverses through the ASA and prints out the each step it takes and points out where it is failing.

To trace a HTTP packet from the inside address of 10.1.1.1 to outside address of 4.2.2.2 the command would be:
packet-tracer input inside tcp 10.1.1.1 www 4.2.2.2 www detailed


My iPhone connects in my office to wi-fi which also is able to connect through my VPN router.  For my laptop, I had set the DHCP settings on my wireless router to include the internal CoNetrix DNS server.  When I connected my phone which uses Exchange active-sync to connect, it would get an error about the certificate authority being untrusted and hit OK to continue. 

Later on I noticed that my phone kept getting synchronization errors and would get the pop up about the certificate authority being untrusted.  What I later noticed was that the server name would change from our internal to external back and forth.  [more]

I later realized that our DNS server had a host record that was the same as our external mail server address.  Each time the phone went on and off my wireless network, it would keep switching server names because the internal DNS would resolve to the actual internal server name. 

I removed the DNS server for the CoNetrix internal network from my wireless router and the phone has only connected to webmail externally.  It no longer tries internal access.