Blog: Exchange Server

This is a followup to the November 18th post concerning limits on how many Outlook rules can be created.  The limit is actually on the amount of storage the active rules take up.  Exchange 2003 has a fixed limit of 32KB.  Exchange 2007 has a default limit of 64KB, but it can be increased to as high as 256KB.  This is specified as a mailbox attribute called RulesQuota and can be changed with the Set-Mailbox Exchange Management Shell command.  The Set-Mailbox command is documented at http://technet.microsoft.com/en-us/library/bb123981.aspx

Here are examples that list the RulesQuota setting for each mailbox and set the quota for all mailboxes to 256KB. [more]

Get-Mailbox | ft DisplayName,RulesQuota

Get-Mailbox | Set-Mailbox -RulesQuota 256KB

And here is an example of how to set the RulesQuota on just one mailbox, conetrixuser’s, to 128KB.

Get-Mailbox | Where-Object {$_.Alias -eq "conetrixuser"} | Set-Mailbox -RulesQuota 128KB


Exchange 2007 introduces a concept called back pressure. This is a monitoring feature in the Exchange transport service that watches system resources like available disk space and memory. If a resources exceeds a specified limit, Exchange stops accepting new connections and messages so that it can deliver the existing messages without being completely overloaded.  Exchange starts accepting new connections and messages once resources have returned to normal levels. A large number of event log messages about the back pressure situation are logged.  We had this problem at a customer site recently and had to increase the RAM of the Virtual Machine to fix it. [more]

View the TechNet article on Back Pressure for more details.


When restoring a Microsoft Exchange 2003 database, be sure an actual database file exists to restore to.  A restoration of the Exchange Information Store is not a file restore, so the files already need to be in place.  Beginning from scratch in a disaster recovery scenario, you will need to:

  • Install Exchange (since the Exchange installation directories should not be included as part of the file system restore)
  • Patch Exchange with the same Service Packs and Patches that were previously installed
  • Mount the Information Store (empty at the time) – this will create the necessary empty databases
  • Dismount the Information Store (and set it to be able to overwritten by a restore procedure)
  • Run the recovery of the information store
If all goes well, your Exchange installation should be back and running.


We had a customer that was seeing logon failures on their domain  controller (Event ID 680) generated from their Exchange server.  The usernames requested were completely outlandish, and were determined to be simply coming from a dictionary attack.  The only service the bank had exposed was its SMTP service (Exchange server exposed directly to Internet via SMTP PAT).  We did some research and found that the failures were related to the SMTP "Auth Login" command.  The SMTP service was configured to allow Basic and Integrated authentication.  It appears that someone was using some type of dictionary attack from the Internet to try to guess valid user accounts and passwords via the SMTP service.  We disabled authentication support for the SMTP service so “Auth Login” is not available. [more]


One of our customers is running Symantec Mail Security for Microsoft Exchange 5.0.  We were having trouble with the service hanging up in a "Starting" state when the server started up.  [more]See below the picture below.


I wanted to delay this service from starting up until the server boot process was further along.  Using the command “sc query”, I was able to see the Service Name: SMSMSE that matched up with the Display name in the services list.

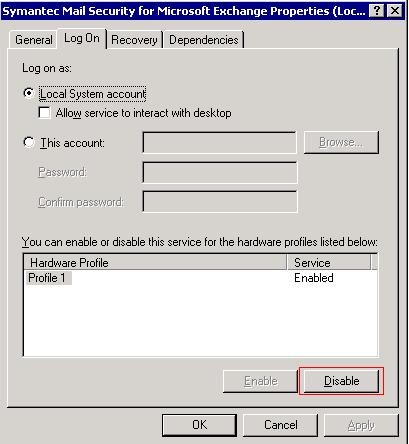
Since the service was hung up, I could not set the service startup type to disabled or manual.  In the service properties, Log On tab, click the disable button to disable the service from starting up for the hardware profile, and reboot the server.  After the server has rebooted, make sure to go back and “Enable” the hardware profile.

While the server was booting up, I connected to the services list of the server from another PC.  This way, I could see which services were starting up towards the end of booting.  One of the last services to start was “Microsoft Exchange Information Store”.  Knowing that, I needed to find the Service Name to match the Display Name.  Using “sc query” again, I found the service name to be MSExchangeIS.

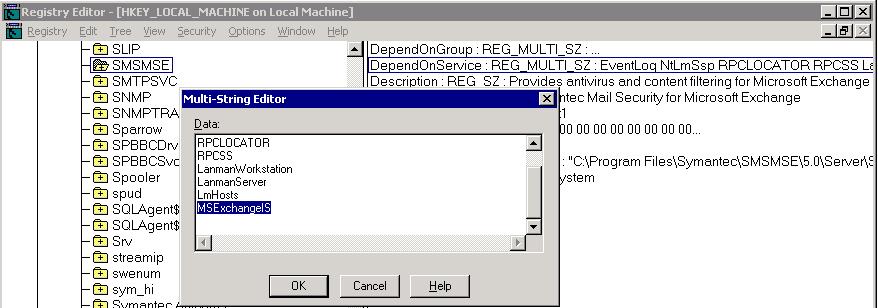
In order to get the SMSMSE service to startup AFTER the MSExchangeIS service started, you have to specify that SMSMSE depends on MSExchangeIS to be started before it can start.  To do this, open regedt32.  Regedit will not work in this case because we have to edit a REG_MULTI_SZ key.  Go to the following location in the registry: HKEY_LOCAL_MACHINE\SYSTEM\CurrentControlSet\Services\<Service name>.   The key to edit or add is “DependOnService”.  In this case, I added “MSExchangeIS” to this list so the service would not try to start until this service was started.


After this change was made, the SMSMSE service was delayed long enough for it to be able to startup automatically.


Use caution when installing and SSL certificate for OWA or OMA on a clustered Exchange server. When you configure Microsoft Outlook Web Access to use a Secure Sockets Layer (SSL) connection to a Microsoft Exchange Server 2003 computer, you may notice a dramatic increase in CPU usage by the Lsass.exe process and by the Resrcmon.exe process. The only way to get the process back in check is to reboot the server. This problem occurs on an Exchange 2003 computer that is running in a Microsoft Windows Server 2003-based cluster. [more]
 
Additionally, an Error event that is similar to the following is logged in the Application log:
Event Type: Error
Event Source: MSExchangeCluster
Event Category: Services 
Event ID: 1014
Date: Date
Time: Time
User: N/A
Computer: Computer Name
Description: Exchange HTTP Virtual Server Instance - (GENESIS): IsAlive checking for this resource failed due to timeout

The solution is to install Exchange 2003 SP2 or you can call MS for the hotfix. I actually like the SSL termination on the ISA server approach a little better. If the SSL tunnel is terminated on the ISA server, you can reinitiate another SSL tunnel with another internal certificate OR you can redirect the traffic to port 80 on the inside interface. Terminating the SSL connection on the ISA server offloads processing from the Exchange server, which is usually a good idea.


If you want to restore a SBS 2003 box that was upgraded from SBS 2000 using tape backups from Backup Exec, here is the process…and believe me this is abbreviated. [more]

  1. Install SBS 2000 so that you can get the system path to be c:\winnt and some necessary dlls that will break the kernel if you try to go directly to SBS 2003. It is temping to use an unattended install and skip directly to SBS 2003 with a  custom install point, but I speak from experience…it doesn’t work. No need to install and configure DNS…I know it sounds like it will break, but it won’t. The only component that should be installed is SBS. Don’t install Exchange, ISA, SQL or the optional components….JUST SBS. Trust me. Be sure to name the domain the same as it was before during setup.
  2. Your goal is to get to SBS 2003, but before you upgrade your SBS 2000 install, you must install Windows 2000 SP3, then SBS SP 1a, then Windows 2000 SP4. Having fun yet?
  3. Upgrade to SBS 2003 and then fix what didn’t work when you upgraded it….just kidding this actually works pretty well considering.
  4. Your next step is to get Backup Exec up and running. So either reinstall Backup Exec on the SBS 2003 box and inventory your recovery tape or install the tape drive and Backup Exec to another server and do it there. Really doesn’t matter where you do it from. Make sure your backup exec service account has access to your restored server if you moved it to a different server.
  5. Reboot your restored SBS 2003 server into AD recovery mode by pressing F8 at boot time. It’s like booting to safe mode, but it’s a different option on the same screen.
  6. Do the authoritative restore, but DON’T restore anything that has anything to do with SQL, Exchange. That includes program files directories, databases, all the other items that are included in the doc link below. Yeah, this seems strange, but bare with me. Oh, and if ISA was originally installed, you can restore it, BUT if it was set up to log to a local SQL MSDE database (which most are because it is an SBS install and I think that is the default behavior), it won’t work. Exactly how ISA will act once restored is somewhat of a mystery so best of luck to you. IMO, just remove it and deal with it after all this mess is done.
  7. Reinstall SQL Server and Exchange Server from media. I know, I know….you have a backup of it so why do you have to reinstall it from the CD that you don’t have. Because…
  8. Using single user mode, restore the master SQL Server database first then restore all the other databases.
  9. Reinstall Exchange with the /disasterrecovery option. Follow the instructions in the doc…just follow the doc. Just get ready to run eseutil on your databases because they will need it, especially if circular logging was turned on at the message store level (and if you are the one that turned circular logging on…shame on you!). Mount your databases after all the consistency checking is complete.
  10. Now, take a breath, go get a burger from Whataburger because by now it is 2:00 in the morning and that is the only place open.
  11. Address the literally hundreds of issues that will arise after you have done this procedure.

Here is a link to the unabridged version:  http://seer.support.veritas.com/docs/243037.htm 

Oh, and in all this you better hope you are restoring to similar if not the same hardware. The support on this process from Backup Exec goes right out the window if you aren’t restoring to the same/similar hardware. And you MUST have the media to reinstall all this stuff. Gathering this type of stuff seems trivial, but it is actually one of the MOST difficult parts of this process, especially if the customer is not a volume license holder.


A customer using Symantec Mail Security for Microsoft Exchange 4.6 needed to release an e-mail that was thought to be in the quarantine along with 2500 other items.  When the customer checked the quarantine, the page displayed a heading of 1000 of 2500.  There were no other links to click on to see page 2 or all items.  After other searching, I understood that Symantec is set to only show 1000 items in quarantine, but I could not find a way to change this setting.  Since this was an html based application, I saw that the source page was an .asp file.  Commenting out the following code will always list the entire quarantined items. [more]

File:  D:\Program Files\Symantec\SMSMSE\4.6\Server\ROOT\Quarantine.asp

*** This is where the Maximum display value is coming in.. = 1000
dwMaxDisplay = objSMSMSEGUI.GetQuarantineValue("",QUARANTINE_DISPLAY_LIMIT_ID_STR,RetVal)

*** Comment these lines here as shown with //
//if NumItemsInQuarantine > dwMaxDisplay then
//          dwDisplayCount = dwMaxDisplay
//else
            dwDisplayCount = NumItemsInQuarantine
//end if

*** This is the code part of the code that shows the items in quarantine
' loop through the items up until the maximum display or the total items whichever is larger
for i = 0 to dwDisplayCount - 1


Here is how you can remove a corrupted message from a user’s mailbox using Microsoft Exchange Server MAPI Editor (MfcMapi): [more]

  1. Obtain MFCMapi from Microsoft’s website.
    http://download.microsoft.com/download/4/9/f/49f2ce91-72c5-45f5-9849-401cd9b86d67/mfcmapi_bin.exe
  2. Run the downloaded file and extract the files to an appropriate location.
  3. Run MFCMapi.exe
  4. Click Session -> Logon and Display Store Table.
  5. Select the appropriate profile (usually “Outlook”) and click OK.
  6. Select MDB -> Get Mailbox Table…
  7. Type the appropriate server name for the exchange server and click OK.
  8. Double click on the mailbox you’d like to manage.
  9. Expand the Root Container -> Top of Information Store
  10. Double click the mailbox folder where the corrupted message is contained.
  11. Find the corrupted message in the list.
  12. Right click the message -> Delete Message
  13. Choose Permanent delete passing DELETE_HARD_DELETE (unrecoverable) as Deletion Style and click OK.